Friday, December 30, 2016

Getting Ready to Paint

We had hoped to paint the camper this holiday break, but the "uh ohs" that plagued our early days of restoration returned with a vengeance.  First we ordered all of the supplies needed from Amazon.  Everything arrived on time...except the paint that is apparently decorating the floor of some OnTrac van as we speak.


Since our paint got refunded and reshipped, we missed our warm weather window.  In the meantime, we decided to sand down our hubcaps to be painted.  After a few minutes with some 240 grit paper, a little rubbing compound and some elbow grease, they actually started to look usable as they were.
Wife gave her seal of approval for the pitted but still kinda chrome like finish.  Unfortunately the inside was pretty rusty still, so we hit it with some high rust primer and put them on the shelves.  As you can see, our paint did finally arrive, only to have it rain yet again...certainly nothing to complain about in drought stricken SoCal.  Another weekend...


The Bed

Originally, our camper had a "goucho" style bed/couch.  This is a thin foam pad that folds up into a couch by doubling over the back portion.  Ours was old, smelly and would have taken a lot of work to recover, so we bought a $100 memory foam mattress off Amazon.  FYI, here is what $100 in "memory foam" looks like...3.5 inches of egg crate, 1 inch of higher density foam and 1 inch of memory foam.  Oh well, it's camping, not the Hyatt.


One thing you'll learn about most smaller vintage campers is the rear bed is actually a 3/4 Full.  What's that, you say?  it's about 48 inches vs 54 inches for a full.  Sharing a 48 inch bed with my 20 inch wife, 24 inch me and 2 dogs should be fun.


The photo above is why we bought the foam mattress instead of a spring mattress....a few minutes with a sharp carving knife and it fit perfectly...if only the same could be said for us...

Kitchen Sink Plumbing

Our camper originally had a high pressure city water hookup plus a pump facet from a large water tank under the dinette seat.  The sink itself just drained right onto the ground which is generally frowned upon in modern campsites.

To simplify things we decided to use two 5 gallon Jerry cans directly under the sink.  For the drain side, we used a 1-1/2" plastic RV drain and hose.  This is intended to be mounted to the outside of the camper and hooked to a hose, but we wanted to have the waste tank inside for easy setup, so we needed to trim the waste flange to fit our jug lids.

 A little trimming with tin snips and some sanding and it fits well.
 We cut the drain hose in half for a better fit and hooked it up for a test run...and the pump faucet leaked all over the counter.  Bummer.

We took apart the cheap plastic rocket pump only to find that 3 of the corner standoffs were broken.  What a piece of crap!  A new pump runs $30 and gets terrible reviews, with about half of them seeming to leak, so we did what we always do...


...We improvised! With the trailer, hidden in a drawer, was an old (original?) hand pump made of solid cast metal.  The chrome even looked better than the cheap plastic chrome of the new replacement.  

The only problem was the gasket was old, loose and fell off the piston when pumped.  We tried to take the gasket off the plastic pump, but it was hard plastic and wouldn't come off, so we decided to graft the plastic piston onto the old metal pump mechanism.

As the old pump cylinder was a little narrower, we had to trim and sand the piston plastic again.  In our first test, the pump worked perfectly.  We sealed it up with silicone and will install in a few days.


Holiday Stove Rehab

Our old Holiday stove was in OK shape, if you don't mind some rat feces and a broken knob.  First thing was to disassemble and clean everything.


The left knob stop was broken, so you never knew if it was on or off.  I can't be sure kids playing house didn't twist it too hard, but the fix was pretty easy.  Where the stop pin was broken, we just pushed a little more of the pin out through the shaft and it still had at least half inside.
 We then painted the inside and outside of the box with high rust paint.  We didn't think we needed high temp as most of the heat is directed upwards and the box was pretty badly rusted from the leaking vent above.
 We reused the old copper gas line which was very heavy and good quality.  It had a small kink outside, but no leaks when pressurized with propane.  We replaced the old regulator with a new one from Amazon and the stove fired up great on the first try.

Thursday, December 8, 2016

Never trust a Previous Owner

One thing about buying a 60 year old trailer is that a lot of the original information about the trailer has likely been lost.  Previous owners will tell you the tires are great, there's no rot, "everything works" and it's camp ready.  In our case, the trailer came with a small receiver hitch with a 1-7/8" ball which we assumed was correct.

For our first little tow, we borrowed a 1-7/8" hitch from a friend and everything seemed fine.  It's hard to tell if there's a problem when the trailer is on the ball, but our trip was beset with all manner of clanks, bangs and clunks.  To find out once and for all, we purchased 2 balls, 1-7/8" and 2".  As you can see below, the 1-7/8" is a bit sloppy.


The 2" ball fits pretty well and the hitch latch closes completely, so I think we have a winner.  For anyone out there with a 60s Hadco MK-61 coupler, make sure you try the 2" ball before taking a long trip.


Sunday, November 27, 2016

Upper Cabinet Doors

Now that the trailer was towable and theoretically watertight and usable, it's time to revisit all the little details that got left behind.

When we bought the trailer, it had gross sliding doors on the upper cabinets.  To make matters worse, the PO had put yucky contact paper over the gold glitter patterned formica.  It didn't really matter since we ditched the glitter countertops, but it's just not something we would have done.


To replicate the construction of the other original doors, we ripped down 1x2 into 1/2x2.  We then cut a 3/8x1/4" rabbet into the edge using our cheap table saw (note to anyone, please never buy Ryobi anything...).  This will allow the door to overlap the cabinet front and recess into the opening.


We then cut the front panels from leftover 1/8" birch paneling and glued the frame on.  I knew we kept that weight set around for something.

The completed subassembly.  We used the table saw and a chisel to rabbet the remaining end boards.  A router table is definitely on the want list (just not Ryobi).  After this photo, we cut more panels to glue to the interior as was done originally.  this is not necessary but adds a little strength and gives a finished appearance.

Back to shellac.


Here you can see a bit of the rear panel with the door installed.  We used 3/8" offset hinges which is why the original rabbet was 3/8"x1/4".  When you account for the 1/8" interior panel, the hinges fit perfectly.  We also used double roller catches on the lower portion of the door to keep them closed and we reused the original slider knobs, painted with black hammered Rustoleum.

The doors installed.  Even Maggie is happy to see those old sliders gone and the holes covered up.


Tuesday, November 22, 2016

Our first outing

One small benefit of living in Taxifornia is the Permanent Trailer Identification.  Basically $10 registration for 5 years.  To get verified you must be less than 16 feet with no bathroom.

Our DMV appointment got us to the first window right away.  This was followed by standing in the verification parking spot with a clipboard like idiots (as instructed),

2 trips to measure (with our tape measure because they didn't have one), 2 counters, 2 people and a half an hour clicking around the computer system, a call to tech support, multiple forms, declarations, appeals and $40 (credit cards not accepted), we got the PTI sticker.
When the computer said they no longer issue stickers, I jokingly asked if she had some in the back of her drawer.  After 2 hours of paperwork, she opens the drawer and finds a sticker, lol.

Saturday, November 19, 2016

Towing safely

Our old safety chain was a joke, a broken link welded under the coupler.


A few good tugs and the link sheared right off.


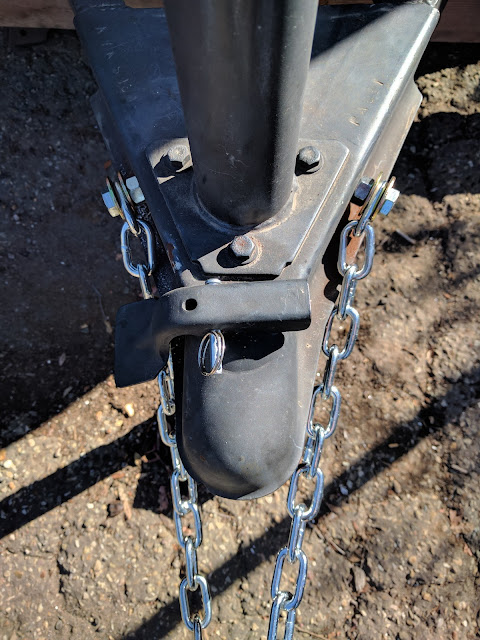
We replaced it with a pair of 5/16", 5000lb rated safety chains.  They are bolted through the coupler and frame rails using Grade 8, M12 sized hardware.


Monday, November 14, 2016

Bearings and new tires

We should have done the bearings and tires when we had the body off the frame.  At the time, we always had it in the back of our mind that the thing might end up at the dump, so why waste the money on new tires.

Now, towards the end of the project, with our registration date approaching at the end of the month, we finally needed to stop procrastinating.  First task, get the wheels off.  For this, we put the frame on 4 jack stands and took the wheels to Costco.


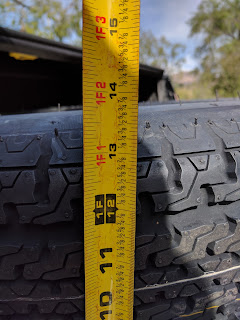
We had ordered the tires online earlier in the week.  They are Greenball radial tires vs the old bias ply tires originally installed on the trailer.  Compared to the 32" tires on the truck, these little 24" tires on 13" rims are tiny.

We were a little worried about the new tires fitting.  Many online sources said radials could be wider than bias ply.  Turns out, even after mounting, the new tires are actually narrower.  The radials should also get better mileage and run cooler.


With the tires back at home in under 2 hours (including a few other errands), it was time to address the hubs and bearings.  There are many tutorials online about greasing trailer bearings, so this won't be another one.  Suffice it to say, the potentially scary process was pretty easy.

Getting both hubs disassembled and cleaned was a pretty quick process.  We finally found a use for our dopey corporate magazine.
Getting the rear bearings out requires a special tool.  I didn't have the right diameter pipe to push them out and didn't want to use anything damaging, so I "borrowed" some 1-1/4" pipe from a neighbor and sanded it down to the right outside diameter to push the bearing and seal out.


All nice and clean and ready for new grease.


The reassembled hub


The cotter pins originally used were very small 1" size, so the wife ran out and got some longer pins to make sure the castle nut was secure.


The wheels back on and ready to roll.


We sorta changed our mind on the color to paint the rims, so will hold off until we paint the whole thing.


With the rest of our weekend, we started reinstalling the trim that covers up each panel seam.  It's quite a bit darker than the new birch, even with only clear shellac, but it's a look that's growing on us.  We have to add some more shellac to a few panels anyways, so they will darken up a bit more.

Sunday, October 30, 2016

Cheapskate fan

Many trailer renovators install a Fantastic Fan to keep the trailer cool.  Unfortunately, the $200 fan is not in our budget, so we got creative and bought a Heng Vortex retrofit fan.

The instructions are a bit worrying in their 1980s copier appearance.


The fan comes with a small gearbox to move the vent crank mechanism in a modern trailer.
 Luckily, the holes for the vent crank lined up directly with the holes in the fan.  This meant we needed an extension for the crank knob.  We considered using a piece of plastic tubing or metal pipe, but in the end, we just took the gears out of the supplied mechanism, used the gearbox screws to bond them together and they fit perfectly, if a little hacky.

Reusing the high quality vent and trim that matches our windows is exactly the type of rebuild we are going for.  It actually looks OK and works great.  We will probably add some foam gasket material in the gap and add a PWM speed controller after we take it for a test run.


Here is how loud the fan is when on.  We will probably add a cheap PWM DC motor speed controller in the future, so it doesn't sound like a wind tunnel if we need the fan at night.

Tow Electrical

As we need to be roadworthy to register in one month, we started the trailer electrical wiring.  We made sure to add a ground wire to each fixture that wasn't there before.


Our Autolamp 575 lenses were trashed and even the replacements a friend gave us were too brittle to use.  We bought cheap 7" bus lights from etrailer.com as they are the only 7" option.  For our skin mounted fixtures, we tapped the bases flat, added a ground wire to the lug that was hidden inside and used putty tape to mount instead of the foam provided.  
 For the 7 way plug, we bought a 6 foot harness on amazon.  We mounted it to the tongue, wired it all up and....the right rear light was shorted to ground!
 After an hour of fussing with the lights, we finally unplugged everything, only to find the junction box we bought had a short inside!  We taped up the shorted wire, reconnected everything and then tested all the lamps with a small test battery before plugging into the tow vehicle and blowing a fuse.
 Success!  Just need tires and bearings and we are road worthy!